Superior Feature
CREATING A MASTERPIECE
- THREAD PAINTING
- STARRY NIGHT
- ART QUILT
Quilt created by the talented Emily Milne
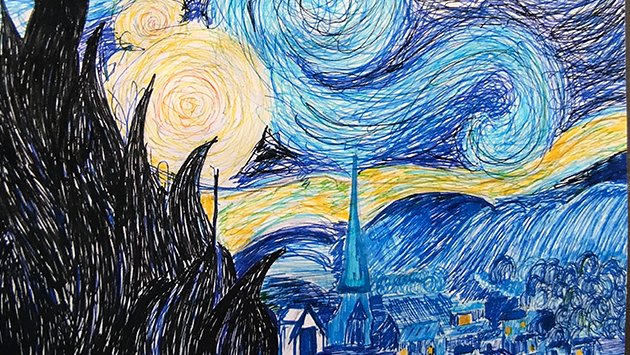
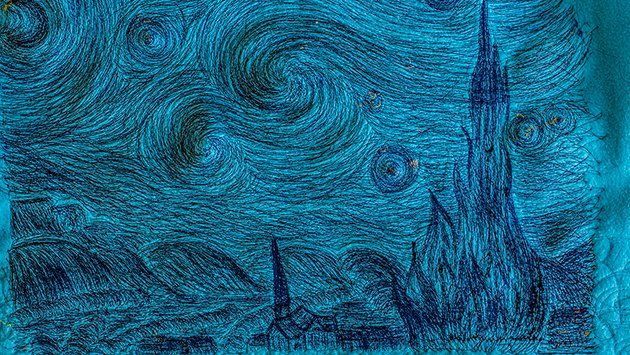
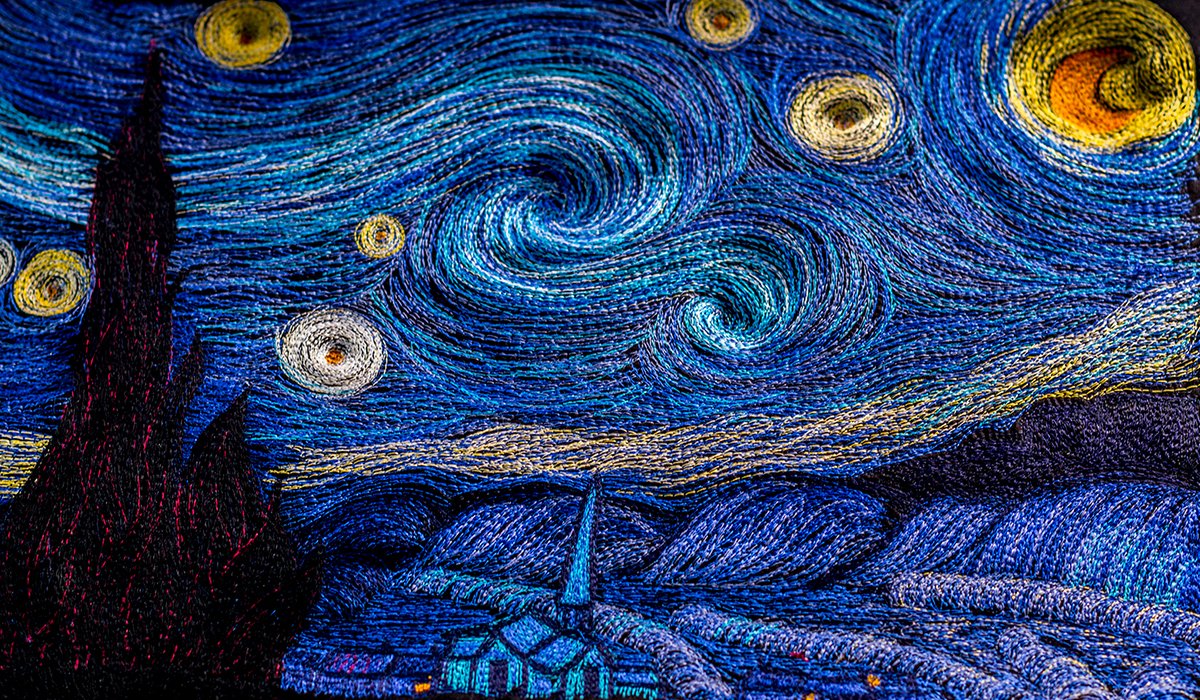
The Starry Night Quilt
Thread painting is a technique where the fabric is the base and thread is treated as the medium to decorate. Whether in small, detailed stitches offering dimension, or broad brush stroke-like appearance to coat a large area, thread painting is a beautiful way to translate art quilting into a feature unlike any other type of quilting. Our friend, Emily Milne, is an exceptional artist and a decorated quilter. We saw a mini quilt that she created that translated Vincent van Gogh's famous painting The Starry Night into a beautiful art quilt. We asked if she'd create a larger version of the quilt that we can have on display at our office and she graciously obliged.
Below is the story of how Emily came up with the idea, then created this fantastic art quilt, in her own words.

Hi, I'm Emily and I'm a recent graduate from King's College London, where I studied French and Spanish. In my spare time, I like quilting, baking, and salsa dancing. More recently, I've gotten into thread painting as my preferred method of quilting. This article documents the methods for my very own quilted version of the famous The Starry Night painting and how I turned an idea into a quilt that I'm really proud of. I've always loved the movement and bright, bold colors in this painting. Something about the fluid brush strokes and the blending of blues in the night sky captures my attention. A few years ago, my sister was doing a pen drawing of the painting and it got me thinking, maybe I can replicate the painting with a sewing machine and threads?
The pen drawing my sister created
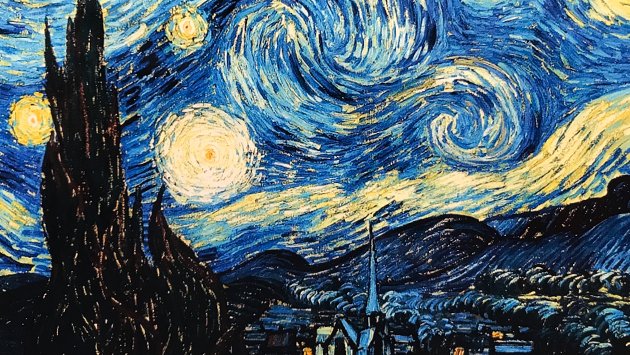
The original painting by Vincent van Gogh
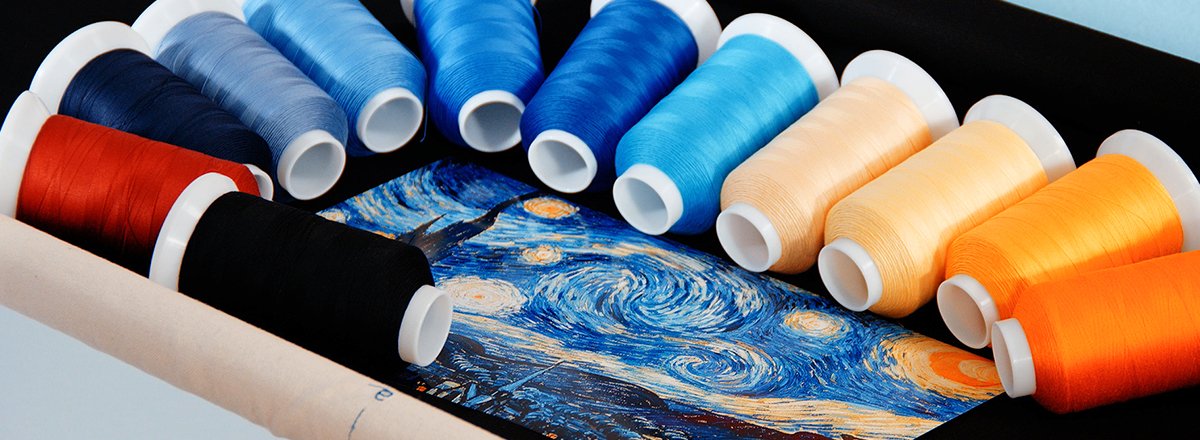
I knew that I needed deep, rich colors in order to replicate the vision that was in my mind. Shading is important when painting and I wanted to bring this to life when thread painting. Layers of colors on top of each other adds a dimension that is really hard to mimic without stacking colors. I chose to use MasterPiece by Superior Threads on this quilt for a few reasons:
- MasterPiece thread is a 50 wt. Egyptian-grown extra-long staple cotton thread.
- This meant that there would be relatively low lint, especially when considering how much thread is going to be used. I did not want to have to stop and clean my bobbin case or machine on a regular basis due to excessive lint that other cotton threads have.
- The 50 wt. thread was a perfect choice because I wanted to go really deep with layers and I didn't want to have too much bulk by using a thicker or heavier thread.
- The colors offer a subtle texture with rich tones. The theme I wanted present throughout this quilt was the appearance of brush strokes and the rich color depth allowed me to translate what I had imagined in my mind onto the fabric.
I chose twelve colors of MasterPiece thread: #170 Bernini, #121 Cezanne, #125 Soleil, #123 Lemonade, #184 Buttercream, #169 Van Gogh, #176 Waterloo, #139 Marine Blue, #140 French Blue, #141 Starry Starry Night, #174 Indigo, and #161 Raven.
I use a New English Quilter frame and a Juki sewing machine as my go-to setup. The frame stretches my fabric like a canvas and the free movement of the carriage lets me move my sewing machine like a paintbrush, with my hands guiding the motion in any direction. My Juki machine does a perfect straight stitch and reaches 1,500 stitches per minute without breaking a sweat. I can go pedal to the medal if I choose to. I always use a Superior Topstitch #100/16 needle when thread painting because the thread needs plenty of space to fly through my machine (which is stitching at 1,500 SPM). The large eye also makes threading the needle a breeze, which I'm extremely grateful for.
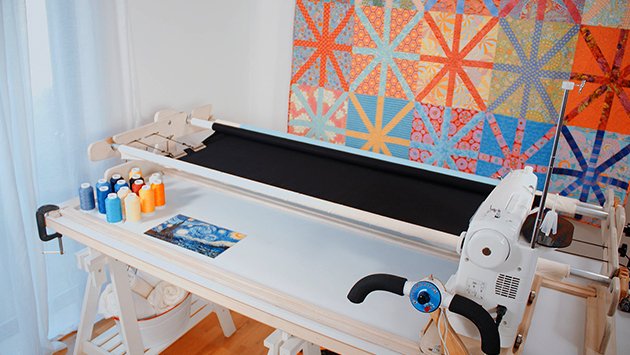
My New English Quilter frame and Juki sewing machine
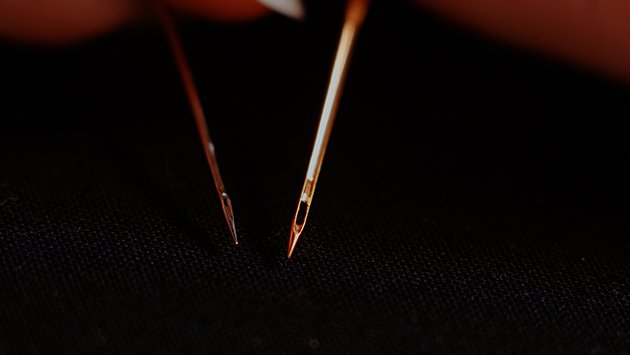
My favorite needle for Thread Painting, Topstitch #100/16
To start the actual quilting, I made sure to have everything set up and close by. I arranged the fabric on my frame, organized my MasterPiece threads, put a new Topstitch #100/16 needle in my machine and kept my reference print of the original painting close by. I started by stitching a base layer of color #174 Indigo to keep the two layers of fabric together and also to create an outline of the basic shape. Starting with a dark color like Indigo allowed me create a baseline as well as help prevent rucks in the fabric as I layered more and more stitches on the fabric. A bonus of using a dark colored thread on dark fabric was that any mistakes would be covered up when I stitch with brighter colors. I used tailor's chalk to set reference lines for basic shapes. These guidelines were very helpful to compare the quilt to the painting as each color progressed onto the next. Once I finished my base layer with Indigo, I could see the texture starting to come to life!
One challenge that occured while I was quilting was the act of blending the colors together. I wanted to avoid the blob effect, where it looks like a group of colors are stacked without definition. I'm trying to create a Van Gogh painting, not a Jackson Pollock painting (maybe that should be my next project), so I wanted clean lines that color could easily be differentiated from others. After trying a few different methods, I found that by adding a hook-type motion to my lines, the colors were preserved when layered and it created a unique, abstract appearance.
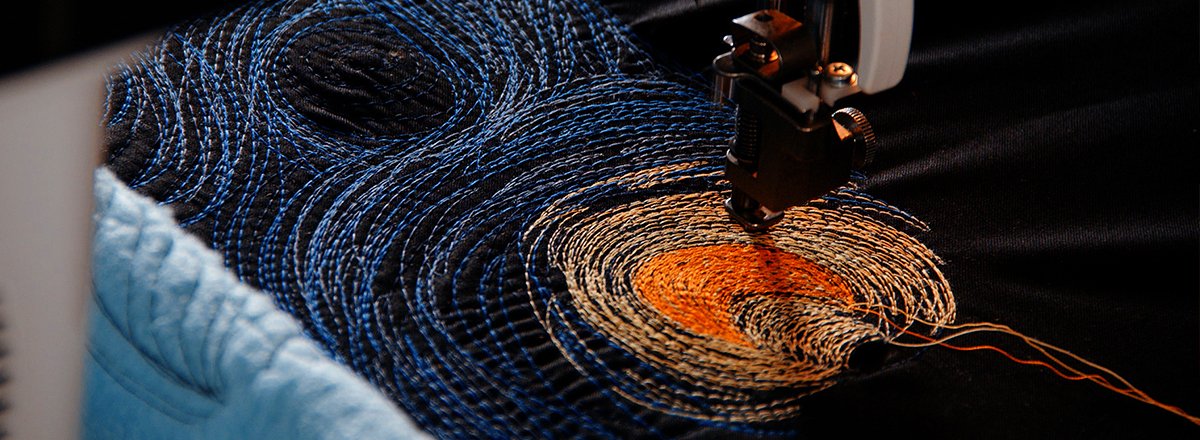
Texture played an important role in this project. I decided not to use stabilizer between my layers of fabric because I didn't want the finished quilt to be stiff or flat. Layering the threads so much creates ripples in the fabric - a texture I love because it really helps to translate the movement in the original painting. I really focused on creating this texture in the moon, stars, and central swirl. I was especially pleased with the way the moon sinks into the fabric, creating great texture with the yellow thread surrounding the shape of the crescent moon.
The finished piece measures 19" wide by 12.5" tall. I used nearly 1,000 yds. of thread from my MasterPiece cones and 7 prewound SuperBOBs prewound bobbins throughout the project.
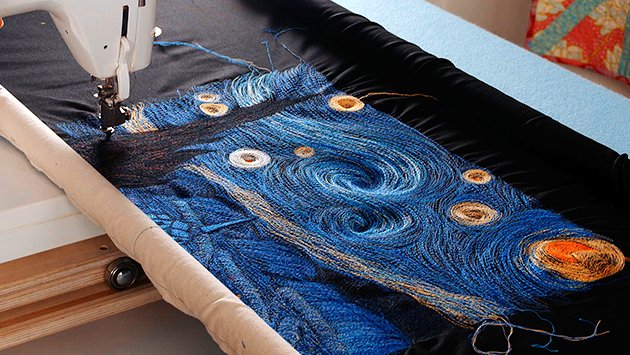
The thread painting process
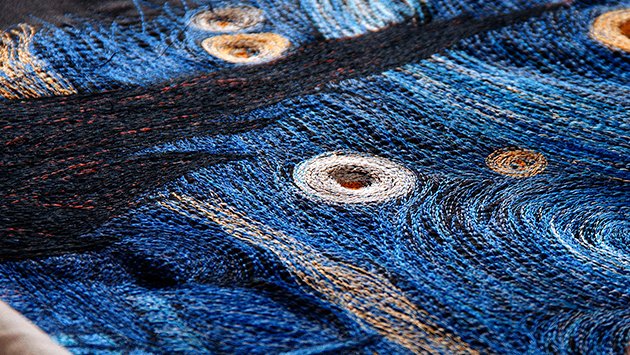
Texture is lovely!
The quilt back. Look at all the thread!
I learned a lot about movement, texture, and layering on this project. I loved the freedom of using so many different colors in a small area and finding a way to blend them together, while retaining their individual vibrance. I thought it would be a fun experience to record a video of this process as well. You can watch our Starry Night Quilt Video to get a greater view on how this project came together.
I hope this inspires you to try something new!
 View Our Product Catalog